
Saturday, December 23, 2006
Return the Kick Serve
When I was a kid (and some question whether I still am), I was a big fan of the SUPER BALL®. For those who don’t remember, it’s that plum-sized, brightly colored rubber ball, that takes crazy high-hops when you bounce it. It’s nearly impossible to tell which direction the ball will dart, and trying to catch one can make you look foolish and feel uncoordinated.
It’s a little like trying to return a heavy kick serve. If one of the toughest shots to learn in tennis is a kick, figuring out how to return one isn’t far behind. The ball jumps up and away from your strike zone, hindering you from taking a good crack at it. And if you’re trying to defend against an effective kick, it may feel like you need a stepladder to return it. Here are a couple of options when dealing with this potent weapon:
Let it spin out: If you’re not an aggressive player, you may want to move back well behind the baseline to allow the ball to reach its peak and start to drop downmany good clay-court players apply this tactic. A drawback with this strategy is that the kick serve pushes you wide of the court (out toward the doubles alley), but you will be able to take a big swing at the ball. And you’d better, otherwise your shot will land short and your opponent will gain control of the point. Another potential issue you may run into is if your opponent is capable of coming in behind his serve. Since you’re so deep, they’ll have plenty of time to get on top of the net and in excellent volleying position. That’s why I prefer to. . .
Move in and take the ball early: It’s always wise to mix up your return positions so your opponents don’t find you predictable. That being said, most of the time I find it best to move inside the baseline on a kick serve and make contact with the ball while it’s rising off the court. At this point the action on the ball hasn’t taken it out of the strike zone, and you don’t have to forfeit court position by moving back. It’s a trickier shot than letting the ball spin itself out, but it affords you the chance to be offensive with your return.
Tuesday, December 19, 2006
Saturday, December 16, 2006
Tuesday, December 12, 2006
Between the legs shot
This is the ultimate show-time shot. I don’t generally advocate it because you seldom win the point with it, but returning a lob from between your legs will please any crowd.

To familiarize yourself with the technique, practice it while standing still. Hold your racquet with a Continental or Eastern backhand grip to give your wrist ample snapping flexibility and to get more of the strings on the ball. Turn away from the net and bend your legs to get a wide base. Now drop a ball right between your legs. This will allow you to swing through contact without banging the racquet on the court or against your body.
When the ball is at shin level, snap the racquet down, squaring the face at impact. Depending on your objective, you can either bring the racquet through the hitting zone with a slight low-tohigh motion, which will be more of a drive shot, or you can snap up severely, which will produce a defensive lob.
After you get comfortable hitting from a stationary position, incorporate some movement by tossing the ball up and toward the baseline. Instead of running to the side of the ball, go straight at it. As you approach, make sure to overrun it a bit so you can take a full and, more important, safe swing.
Friday, December 08, 2006
Sunday, December 03, 2006
Wednesday, November 29, 2006
Sunday, November 26, 2006
Use your warm wisely
Gauge your game – My game is built around my forehand, and I usually know once the warm-up is underway how well I’ll perform off that wing and I tailor my game plan accordingly, at least for the first set or so. If my forehand is on I know I can play more aggressively from the outset and afford to take more chances. If I’m misfiring on that side I immediately start to get myself into the mindset of playing more patiently and waiting for my openings.
Scout your opponent – One of the oldest tricks in the game is to hit down the middle to the other guy during the warm-up and see whether he moves to his forehand or backhand. Usually, the side he picks is the stroke he’s most comfortable with and you should plan accordingly. Pay attention also to your opponent’s volleys. If he gives short shrift to his net game during the warm-up you can bet he’s not going to be too inclined to come in very often when the match gets tight. We tend to favor those aspects of our game that we’re most comfortable with during the warm-up, so take note of your opponent’s tendencies.
Sunday, November 19, 2006
Learning from Rafael Nadal

What the dynamic Spaniard’s game can teach you.
1. Don’t play the score. Nadal has become one of my favorite players to watch because of his sensational attitude. Whether he’s up 5-0 or down 0-5, he maintains his intensity. The only thing on his radar screen is winning the next point. If Nadal plays it well and wins a hard-fought exchange, out come the fi st pumps. That’s the greatest approach to have as a tennis player. If you allow the score to influence your demeanor, it will have negative repercussions on your game. And it’s not just if you’re losing and getting angry. Relaxing with a lead and thinking prematurely about an easy win can be equally destructive. Nadal takes nothing for granted. He never phones in a point, and he competes hard until the last point is over. Develop that kind of mind-set and you’ll win more matches.
2. Attack a weakness. Being a lefty, Nadal has the distinct advantage of pounding his best shot—the crosscourt forehand—into his opponent’s backhand, which tends to be their weaker side. Nadal puts a tremendous amount of topspin on his forehand, so the ball jumps up high on a righthander’s backhand, making it an uncomfortable shot to deal with. Since many players like to run around their backhands, Nadal will keep them honest by going strong to their forehands to open up space on the other side of the court. What makes Nadal unique in this regard is that he’s absolutely relentless. He’ll repeatedly hammer away with his crosscourt forehand until his opponent crumbles into submission. It’s not fancy, but it’s hard to argue with his results. The most basic yet effective strategy in tennis is to pit your strength against your opponent’s weakness. The best players are the ones who can construct a majority of their points on those terms.
3. Make adjustments. Nadal is dominant on clay, but he can change his game to compete successfully on fast surfaces, as he proved with his run to the Wimbledon fi nal this year. Instead of playing from 8 to 10 feet behind the baseline, Nadal will move up further in the court and take the ball earlier. He’ll also fl atten out his backhand to get more penetration and use the speed of the surface. On clay Nadal will play it safe and hit more kick serves, while on a fast court he’ll toss the ball farther out in front of his body and try to crack some bombs to win a few more free points. So take note: You may have a certain style that you prefer, but if you want to win on all surfaces and against various types of opponents, you must be adaptable. Perhaps that means being more aggressive with your shots or pulling back to allow your opponent to self-destruct. Having versatility will make you a much more formidable opponent.
Wednesday, November 08, 2006
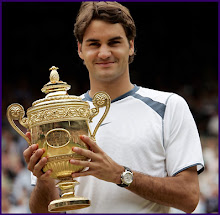
Roger Fedrer's Backhand
Perfect balance, precise footwork, and an uncanny ability to watch the ball make Federer’s backhand a shot worth emulating.
It isn’t just that Roger Federer can masterfully hit any shot in the book—and a few shots that aren’t—but that he makes it look ridiculously easy. One of the keys to Federer’s success, and the principle reason his strokes look so effortless, is his extraordinary balance. Whether he’s hitting his huge forehand or his impressive backhand, he keeps his head and upper body remarkably quiet throughout the stroke.
1. Judging from his knee bend, you can tell that Federer is preparing for a low ball, perhaps an approach shot from his opponent. Even though he’s reacting quickly, he looks completely under control. He’s already changed his grip to one that’s slightly farther over from a classic Eastern. Also, notice the position of his racquet as he’s moving. Many players think you should prepare by immediately taking the racquet all the way back, but that’s not an efficient way to run. And while Federer’s shoulders have begun to turn, he won’t rotate them more until he plants his right foot.
2. Cradling the racquet in his left hand to control his backswing, Federer starts to turn his shoulders in unison with his racquet take-back. I like how his head is right in the center of his body. Pay attention to how he’s pointing his shoulder at the oncoming ball. This ensures good upper-body rotation, which is something many beginners and intermediates don’t do well. A full shoulder turn, along with a sound backhand grip, will help you drive the ball as well as avoid elbow problems.
3. This is a striking example of Federer’s excellent balance; he’s in the optimal position for this low ball. Even though he’s dragging his toe, he’s still got a lot of his weight on his left foot. Many players would have moved most of their weight onto their front foot at this point, which would cause their momentum to continue to the side after striking the ball and result in a more difficult recovery. Federer’s racquet is all the way back at this point and his shoulder turn is full, about 45 degrees to the baseline. His head, though, has barely moved from the previous photo.

4. Federer has just struck the ball and his left knee is almost touching the ground. His upper body remains still and balanced. This shot reminds me of how great downhill skiers allow their legs to go up and down like pistons but their upper bodies remain relatively quiet and straight up. Federer’s legs are doing all of the work of getting low to the ball; he’s not bending at the waist. It takes great core and quad strength to do this, but the payoff is that there’s no stress on the back. The angle between his arm and his racquet shows that he’s using a strong grip that will resist impact well.
5. Federer’s non-playing hand is back and down to counter balance his racquet hand going forward and up. Also, when the left arm goes back like that, it keeps the shoulders from turning and accelerates the right arm, giving you more power. As you can see, Federer’s shoulders are still sideways to the baseline. One common problem that players have with the backhand is that they pull up and open their shoulders so they almost face the net, losing power and control. Here, Federer’s head has hardly moved at all, and he has finished with his body perpendicular to the target.

6. Federer is recoiling after the swing,and it’s only now that he has started to look up and watch his shot. His body is still balanced, and because of that he won’t have to take an extra recovery step. If he were leaning over on such a wide shot, he would have to take one more step. One of the big differences between a good player and a great player is recovery, and you can’t recover well unless you have excellent balance. This is one reason Federer gets to so many balls.
-By Stan Smith
Monday, November 06, 2006
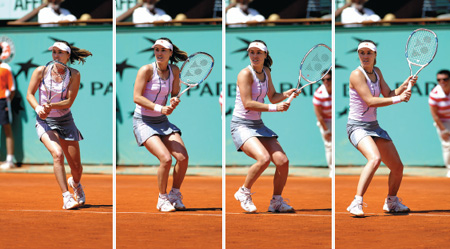
Martina Hingis Drop Shot
It’s a risky play, but great disguise, excellent footwork, and solid technique make Hingis’ drop shot a winner
In a game dominated by power hitters, Martina Hingis’ brand of control-oriented tennis makes her a fan favorite. A genius at geometry, the former world No. 1 uses the whole court to beat her opponents. Not only does she use angles and drives to move them side to side, but she also regularly throws in hard-to-read drop shots to get them running up and back. Here’s how she executes them.
1. Hingis has recognized that she has to hit a backhand, and her preparation has begun as it would for a backhand drive. There’s nothing at this point that would give her opponent a clue that she’s going to deliver a drop shot instead. Also, notice her location on the court. She’s right on top of the baseline and moving forward, which is ideal for the drop shot. You don’t want to try difficult finesse shots from deep behind the baseline.

2. Look at her feet. You can tell she’s using small, measured steps to put herself in position for the oncoming ball. Although Hingis may not be the fastest player on the tour, her footwork—the way she prepares with her feet for each shot—is among the best. As a result, her entire body, from her shoulders to her feet, is perfectly balanced. She appears to be using a semi-Western grip with her left hand and a Continental with her right, which is ideal for two-handed backhands.
3. We now see the first hint that Hingis won’t be driving the ball. Her hands are separating on the grip, indicating that either a slice or a drop shot is on the way. She uses her left hand to cradle the throat of the racquet and assist in the take-back. Also, because Hingis uses a Continental with her right hand on her two-hander, she doesn’t have to change her grip with that hand regardless of her shot selection. Her weight is loaded onto her back foot as she gets ready to step into the ball.
4. We can now tell that Hingis is committed to a drop shot, and not a slice, because her racquet is going higher but not much farther back. If she were planning to deliver a slice, the racquet would be more behind her. Note that Hingis’ body is facing the side of the court, something that players with two-handed backhands often fail to do. For a drop shot, let the ball come to your side more than you would for a drive.
5. Hingis’ weight has almost fully transferred onto her right leg as she continues to move into the ball. Again, look at her balance. The legs, hips, shoulders—everything is in the right position. Her hands are perfectly behind the ball and she’s measured exactly how she wants to address it. Her left hand is still cradling the throat of her racquet and her left palm is lined up with the racquet face, helping to guide it into position.
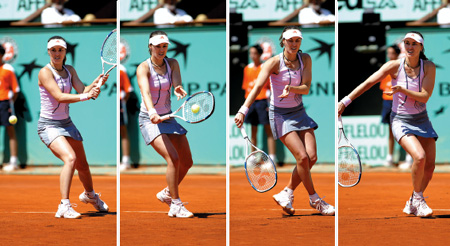
6. Hingis makes contact right in the middle of the string bed. Keeping your shoulders closed helps you swing through the ball, and players with one-handed slice backhands do that by letting their off hand move back and act as a counterbalance. Players with two-handers tend to push through with their off hand—as Hingis does here—and, as a result, have to make a special effort to stay turned.
7. After hitting the ball, Hingis continues to move through the shot and into the court. Her footwork is exemplary. She’s using what’s called a carioca step, which allows her to move forward while remaining sideways. If you look back, you can see her core has remained sideways since the second frame. Her focus is still on the contact point; her head has remained still, and she hasn’t looked up to follow the ball yet.
8. Hingis has started her recovery and has begun to look to the other side of the court to gauge the success of her drop shot. She’ll continue to move forward after striking the ball and will try to anticipate her opponent’s reply, if there is one, and take it out of the air if possible. She never assumes that her drop shot will be an outright winner. This is a great lesson for everybody.
Friday, November 03, 2006
Jump start Your Warm Up
We’ve all done it. We arrive at the court just minutes before our match starts, do a couple of knee bends, and then think we’re ready to play. After dropping the first three games of the set we scratch our heads, wondering why we’re playing so lifelessly. If you want to come out firing bullets instead of blanks, you’ve got to come on the court warm and ready to play.
A quick and effective way to do this is by jumping rope for several minutes. It:
Simulates running– Work the rope up to a good speed and you’ll be ready to sprint for a drop shot when the match starts.
Heats you up – Watch a professional in any sport and you’ll see they start a contest already sweating. For those worried about tiring out, a moderate amount of jump rope will actually energize, not weaken you.
Exercises your entire body – Jumping rope utilizes the wrist, forearm, shoulder, and whole leg, which are all crucial for playing good tennis. It also increases coordination and balance, two things a player can never have enough of.
Saturday, October 28, 2006
One Handed Backhand fix

You lack the power you’d like on your one-handed backhand, especially since you seem to swing with plenty of force. Many times this happens because your racquet is accelerating at the wrong time. Instead of speeding up into contact, you’re actually accelerating the racquet after impact. This can lead to an exaggerated and off-balance follow-through.
Solution
On your backswing, hold the upper throat of your racquet with your nondominant hand so the head is back by your hip and your hitting arm is away from your body. Don’t let go of the racquet until the forward swing snaps it out of your grasp. Think of creating all the power and racquet speed on your stroke from the snap out of the backswing to the point of contact. Make sure your nondominant arm and shoulder don’t rotate around with the start of your forward swing. They should work as a counterbalance, helping you resist the tendency to rotate open and providing more power for the front shoulder to pull and drive the stroke. You’ll find that your racquet is now accelerating up to full speed before contact rather than afterward. This will generate more leverage in your swing and make for a natural follow-through.

Sunday, October 22, 2006
Make the Most of Your Volleys
"Sensible technique and thoughtful strategy will turn you into a force at net." | ||
Wednesday, October 18, 2006
Bounce-hit to Stay Sharp
Whenever you stop playing for a while, or whenever your game goes into a slump, one of the first things to go is your timing. Strokes that felt natural and automatic start to feel like they've been replaced with awkward and forced imitations. And usually, the harder you try to fix the problem, the worse it becomes. But there's an easy solution that you can use any time you need to bring your timing and your strokes back into focus. It's called the “bounce-hit” drill.
Introduced by Timothy Gallwey in his classic book The Inner Game of Tennis, bounce-hit is deceptively simple, but it works like magic.
Here's how to do it:
Whenever the ball bounces, say "bounce" aloud to yourself. And whenever you or your opponent hits the ball, say "hit" aloud as well. This exercise works because it engages your mind enough to allow the more automatic, semi-conscious part of your brain to take over. That helps return your timing and your strokes to normal. And as a bonus, this drill works just as well when you're nervous or when you feel you're thinking too much on the court.
Friday, October 13, 2006
Control Your Service Toss

Start with your weight on your back foot and you'll put the toss in the right spot.
PROBLEM
(see pic above)
Your service toss is hard to control and tends to drift behind your head. This prevents you from getting forward momentum into your swing and makes it difficult to hit the serve with pace and control.

SOLUTION
(see pic below)
When you’re in the set position before you serve, start with your weight on your back foot. As your tossing arm goes up, shift your weight forward onto your front leg. This will help you get your toss in front of your body. It will also get you leaning into the serve and your body moving into the court as you swing through the ball. With the ball in front of you, rather than behind your head, you can hit a stronger flat or slice serve. Initially you may feel like you’re falling forward, but with some practice this momentum will add even more power to your serve.
src="http://pagead2.googlesyndication.com/pagead/show_ads.js">
Friday, October 06, 2006
Returning a Strong serve
One of the rules of the playground is that you should always stand up to a bully. Show weakness and you’re just asking to be pushed around. You can’t allow yourself to be intimidated on the tennis court, either. If your opponent smells fear coming from your side of the court, his confidence and play will usually soar. One of the more common tormentors in tennis circles is the big-serving bully. This is a player who relies on a powerful first serve to win a lot of free points, which lets him take more chances on his other shots. If you have trouble returning his serve, it’s a style that can put a lot of pressure on you. But if you neutralize his weapon, he’s nothing to be scared of.
Here’s how:
Stand a few steps back: Many power servers favor pace over placement. They simply try to overwhelm you with the speed of the serve because they don’t possess the precision to aim for the lines. So give yourself a little extra time to return it by starting farther back in the court (try a couple of feet behind the baseline) than you usually stand. Unless your opponent is following the serve to net, there’s really no benefit in contacting the ball any earlier. You’re better off forcing him to volley rather than piling up errors.
Shorten your take back: You don’t have a lot of time to set up for the return of a big serve. Luckily, since your opponent is giving you so much pace, you don’t need to take a big swing. Simply making solid contact out in front of your body is all that’s necessary for an effective return. Your backswing should essentially be limited to your shoulder turn.
Hit from an open stance: Again, you’re being rushed, so footwork is at a premium. Rather than taking several steps to position yourself, the most efficient way to make the return is to the line up the incoming ball with your outside, or back, leg and lean into the shot. The coil of your upper body and the pace of the serve will supply the power. This will not only help you put more serves in play, it will allow you to move more effectively for the next shot.
Monday, October 02, 2006
Friday, September 29, 2006
Serve
 A serve (or, more formally, a service) in tennis is a shot to start a point. The serve is usually initiated by tossing the ball into the air and hitting it (usually near the apex of its trajectory) into the diagonally opposite service box without touching the net. It may be performed underhand or overhead. The serve is the only shot where a player can take his time to set up, instead of having to react to an opponent's shot.
 The serve is one of the more difficult shots for a novice, but once mastered it can be a considerable advantage. Advanced players can hit the serve in many different ways and often use it as an offensive weapon to gain an advantage in the point or to win it outright. Because of this, professional players win most of their service games, and breaking serve plays a crucial role in a match.
coming soon : more on Serving
Saturday, September 23, 2006
Supercharge Your Practice
Have you ever felt that you could really improve if only you could find better practice partners, yet the reality is that you’re stuck hitting against the same couple of players all the time? You’re not alone. But there’s an easy way to take your practice to another level even if you can’t bring in new blood: Play two on one.
This was a staple of the Australian Davis Cup team back in the 1950s and 1960s when the Harry Hopman-trained squad was dominating the rest of the world. Two-on-one hitting supercharges your practice because it simulates playing against a stronger opponent. Balls that one player might not reach are easily handled by two, and rallies tend to last longer and be more intense.
In fact, one hour of two-on-one drilling, with each player taking two 10-minute turns on the solo side, can be more intense than two hours of regular hitting. The next time you’re looking for a serious on-court workout, or can’t line up a fourth for doubles, consider hitting two-against-one.
Tuesday, September 19, 2006
The Backhand Shot

SHOULDERS » Safin accompanies his racquet take-back with a significant shoulder turn. His front shoulder is even with his chin, and you can see a good portion of his back. This will get a great deal of upper-body rotation into the shot and help him generate huge power when he wants it.
ARMS » As he prepares his racquet, Safin’s elbows are bent and they hug his body. This is going to create a longer and more powerful swing than if his arms were completely straight. In today’s game, the bent elbow is a widely used style, and in my opinion a good option.
LEGS » Safin closes off his stance to hit this particular backhand, but he can hit this stroke with his feet in any alignment. Again, the key for a potent two-hander is good shoulder rotation, and Safin can do that whether his stance is open, or, as in this case, closed.
RACQUET HEAD » Although Safin’s racquet is not much farther away from the ball than Connors’, look how much higher it is. Yet Safin will still have time to drop the racquet below the ball and brush up. This makes for a longer and faster swing that will produce pace as well as spin for safety.
WRISTS » Along with a bend in the elbows, Safin also has some flex in his wrists. This will allow him to drop the head of the racquet below the level of the ball and snap up from low to high, creating significant topspin. Safin can still hit with power and control but can also create sharper angles than if he were to hit primarily flat.
Wednesday, September 06, 2006
Open Stance Forehand
PREPRATION
RACQUET: Moya brings his racquet back above head level. Starting his swing from this point will enable him to generate plenty of racquethead speed. In order to take such a large swing you need time to measure theball.

GRIP: Like many claycourt players, Moya uses an extreme Western grip on his forehand. This closes the racquet face, which allows a player to drop the frame below the ball and brush up for heavy topspin.
RIGHT ARM: Moya’s hitting arm is almost completely straight and extended away from his body. This is good for power but problematic unless you have superb timing. The average player would be wise to bend the arm a little, keeping the elbow closer to the body.
LEFT ARM: What you do with your nonhitting arm is important on a forehand. Here you see Moya bringing it over to the hitting side, which naturally rotates his upper body (his chin is over his left shoulder) and counterbalances his racquet arm.
RIGHT LEG: By loading up and hitting off his back leg, Moya is using open-stance footwork. He has started to flex his right knee and will probably bend it a little more to further load his weight onto that leg and explode up and through the shot.
RIGHT FOOT: The toes on Moya’s right foot are pointing to the side, which facilitates his hip turn. If the plant foot is more perpendicular to the net, it’s much more difficult to get that rotation.

CONTACT
HEAD: A trademark of a top-notch ball striker is the ability to keep the head still at impact. Here Moya’s face is relaxed and expressionless. If your head is jerking around when you swing, it can affect your balance and your ability to make solid contact.
RACQUET: This is a splitsecond after contact and the racquet head is already above the ball. Moya definitely came from below the ball and brushed up the bottom part of it to get some serious topspin.
RIGHT WRIST: Notice how the wrist is laid back and the hitting elbow is tucked in close to the body. That’s the perfect leverage position from which to rock the ball on the forehand.
HIPS: After coiling his body so well in the previous photo, Moya really unwinds into the shot. This rotation creates tremendous power and helps get the racquet, which Moya brought so far back, to contact on time.
RIGHT LEG: Even though he is hitting from an open stance, Moya still has plenty of forward momentum. He takes all of the weight he loaded onto his right leg in the first photo and launches himself up (he’s off the ground) and into (his right foot is now pointed forward) the shot.
Saturday, September 02, 2006
Measuring Your Correct Grip Size

Holding an eastern forehand grip (the palm is placed against the same bevel as the string face), you should be able to fit the index finger of your non-hitting hand in the space between your ring finger and palm. If there isn't enough room for your index finger, the grip is too small. If there is space between your finger and palm, the grip is too big. A too-small grip requires more muscle strength to keep the racquet from twisting in your hand. Prolonged use of a grip that's too small can contribute to tennis elbow problems. A grip that's too large inhibits wrist snap on serves, makes changing grips more difficult and also requires more muscle strength. Prolonged use of a grip that's too big can also contribute to tennis elbow problems.
Keep in mind, it's easier to increase handle size on most racquets. In fact, the majority of today's lightweight racquets' handles cannot be reduced in size. If you're between grip sizes, go with the smaller size and add an overgrip to arrive at the ideal fit. A typical overgrip will increase a grip by 1/16 inch. You can also increase grip size using a heat-shrink sleeve. One heat shrink sleeve will increase grip size by 1/8 inch. Both methods will increase overall racquet weight slightly (7-16 grams) but the benefits of a correct grip size far "outweigh" the disadvantages of this added mass.
We also recommend you replace your grip regularly. A fresh, properly wrapped grip provides you with better racquet control and increased confidence.
Coming soon : " Open Stance Forehand"
Subscribe to:
Posts (Atom)


